Account Manager
Account Manager
Ticketing Guide
Ticketing Guide
Everything you need to sign in, view tickets, add them to your mobile wallet, transfer and manage tickets for Sphere events.
Everything you need to sign in, view tickets, add them to your mobile wallet, transfer and manage tickets for Sphere events.
01
Sign In & View Tickets
Sign In & View Tickets
Signing in
Signing in
1

2
Sign in using the email address and password associated with your Vibee account.
Sign in using the email address and password associated with your Vibee account.


Important
You must use the same email address you used to purchase your Vibee package. If you don’t have an account, sign up using that same email.
You must use the same email address you used to purchase your Vibee package. If you don’t have an account, sign up using that same email.
Viewing your tickets (mobile & desktop)
1


2
Select Manage Tickets to find your order(s).
Select Manage Tickets to find your order(s).
3
Select your event to view your seat locations, barcodes and manage your tickets.
Select your event to view your seat locations, barcodes and manage your tickets.
4
Scan your ticket at the venue for entry.
Scan your ticket at the venue for entry.

What you can do
When Ticket Delivery Delay is enabled, you can only View Tickets and Add Tickets to Mobile Wallet. Ticket Transfer is unavailable until the date listed on your tickets.
When Ticket Delivery Delay is enabled, you can only View Tickets and Add Tickets to Mobile Wallet. Ticket Transfer is unavailable until the date listed on your tickets.
Barcodes & transfers
Ticket barcodes are not visible during the delay period. The ‘Transfer’ button stays greyed out until the barcode is activated — barcodes are visible 3–7 days prior to the event date.
Ticket barcodes are not visible during the delay period. The ‘Transfer’ button stays greyed out until the barcode is activated — barcodes are visible 3–7 days prior to the event date.
Screenshots of your tickets or barcodes will not be accepted for entry into the venue.
Screenshots of your tickets or barcodes will not be accepted for entry into the venue.
Back to top
02
Adding Tickets to Mobile Wallet
Adding Tickets to Mobile Wallet
Sphere uses mobile tickets only. We recommend downloading and adding your tickets to your phone’s digital wallet in advance of your arrival.
Sphere uses mobile tickets only. We recommend downloading and adding your tickets to your phone’s digital wallet in advance of your arrival.
Getting started
1
2
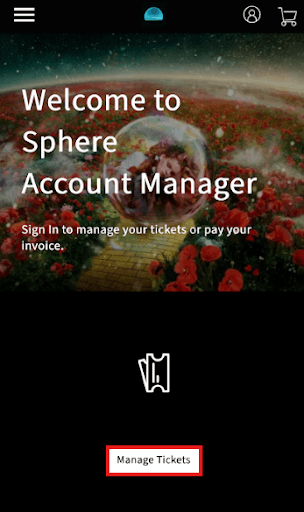
Click on Manage Tickets.
Click on Manage Tickets.

3
From the drop-down menu, select ‘Add tickets to Wallet’ and follow the prompts.
From the drop-down menu, select ‘Add tickets to Wallet’ and follow the prompts.

Apple Wallet
1
From the drop-down menu, select ‘Add tickets to Wallet.’
From the drop-down menu, select ‘Add tickets to Wallet.’
2
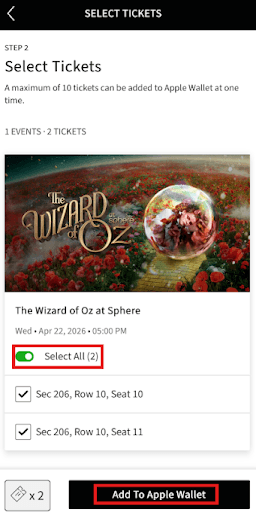
Select the events to add to Wallet.
Select the events to add to Wallet.

3
Select individual tickets, or Select All.
Select individual tickets, or Select All.
4
Click ‘Add to Apple Wallet.’
Click ‘Add to Apple Wallet.’

5
Choose ‘Add All Tickets’ or ‘Add 1 Ticket.’
Choose ‘Add All Tickets’ or ‘Add 1 Ticket.’

6
Open Apple Wallet to confirm your tickets have been added.
Open Apple Wallet to confirm your tickets have been added.


Google Wallet
1
Click ‘Add tickets to Google Wallet.’
Click ‘Add tickets to Google Wallet.’

2
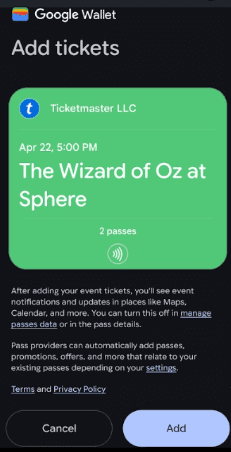
Choose ‘Add All Tickets’ or ‘Add 1 Ticket.’
Choose ‘Add All Tickets’ or ‘Add 1 Ticket.’
3
Open Google Wallet to confirm your tickets have been added.
Open Google Wallet to confirm your tickets have been added.

Barcode timing
Your ticket barcode may not be visible until 3–7 days prior to your event date.
This is applicable to both Apple Wallet and Google Wallet.
Your ticket barcode may not be visible until 3–7 days prior to your event date.
This is applicable to both Apple Wallet and Google Wallet.
Important
Screenshots of your tickets or barcodes will not be accepted for entry into the venue.
Screenshots of your tickets or barcodes will not be accepted for entry into the venue.
Back to top
03
Transferring Tickets
Transferring Tickets
Transferring tickets to members of your group is recommended if you are not arriving together. You can transfer multiple tickets or select individual tickets.
Transferring tickets to members of your group is recommended if you are not arriving together. You can transfer multiple tickets or select individual tickets.
Step by step
1
Sign into Sphere Account Manager.
Sign into Sphere Account Manager.
2
Locate tickets: Tap My Events and find the event.
Locate tickets: Tap My Events and find the event.
3
Initiate transfer: Select Transfer (if grayed out, tickets are not eligible for transfer).
Tickets are generally available to transfer 3-7 days prior to show date.
Initiate transfer: Select Transfer (if grayed out, tickets are not eligible for transfer).
Tickets are generally available to transfer 3-7 days prior to show date.

4
Select tickets: Choose the specific tickets to transfer.
Select tickets: Choose the specific tickets to transfer.


5
Enter recipient: Enter the recipient’s email or mobile number.
Enter recipient: Enter the recipient’s email or mobile number.


6
Send: Click Transfer Ticket.
Send: Click Transfer Ticket.


7
Acceptance needed: The recipient receives an email/text and must accept the tickets to complete the process.
Acceptance needed: The recipient receives an email/text and must accept the tickets to complete the process.

8
Tracking: You will receive a confirmation email once the recipient accepts the ticket.
Tracking: You will receive a confirmation email once the recipient accepts the ticket.
Desktop transfer
1
Log into Sphere Account Manager.
Log into Sphere Account Manager.
2
Click on My Events or Manage Tickets.
Click on My Events or Manage Tickets.
3
On the My Events page, in the top-right corner, click ‘Transfer Tickets.’
On the My Events page, in the top-right corner, click ‘Transfer Tickets.’

4
Choose the event you want to transfer tickets from. If the account has multiple events, make sure you select the right one.
Choose the event you want to transfer tickets from. If the account has multiple events, make sure you select the right one.

5
Select tickets to transfer and add recipient information, or choose from a previous list of recipients.
Select tickets to transfer and add recipient information, or choose from a previous list of recipients.

6
Review the recipient and ticket details, then click ‘Transfer Tickets.’
Review the recipient and ticket details, then click ‘Transfer Tickets.’


Desktop note
On desktop, tickets can only be transferred via email.
On desktop, tickets can only be transferred via email.
Troubleshooting
If the Transfer button is unavailable, the artist/venue may have disabled transfers, or delivery delay is active — transfer is not available until the date listed on the ticket.
If the Transfer button is unavailable, the artist/venue may have disabled transfers, or delivery delay is active — transfer is not available until the date listed on the ticket.
Important
Once tickets are accepted, the transfer cannot be reversed, and the recipient must have a Ticketmaster account to accept. The recipient must accept the transfer by the specified date and time, or it will be canceled.
Once tickets are accepted, the transfer cannot be reversed, and the recipient must have a Ticketmaster account to accept. The recipient must accept the transfer by the specified date and time, or it will be canceled.
Helpful resources
How Ticket Transfer works
How Ticket Transfer works
How to accept tickets (video)
How to accept tickets (video)
How to cancel a transfer (video)
How to cancel a transfer (video)
Back to top
04
Ticket Delivery Delay
Ticket Delivery Delay
When Ticket Delivery Delay is enabled, some actions are limited until your tickets are released.
When Ticket Delivery Delay is enabled, some actions are limited until your tickets are released.
Desktop
Desktop

Mobile
Mobile

Back to top